There are no items in your cart
Add More
Add More
| Item Details | Price | ||
|---|---|---|---|

First of all, we will apply the GPU Acceleration CUDA Settings in Premiere pro For Hardware Encoding and Decoding. After that, we will clear the media cache in Premiere Pro to increase the preview speed and rendering speed. Finally, we will apply Nvidia Control Panel GPU Settings and install the Nvidia Studio Driver to render faster in Premiere pro.So,
let's see them one by one.
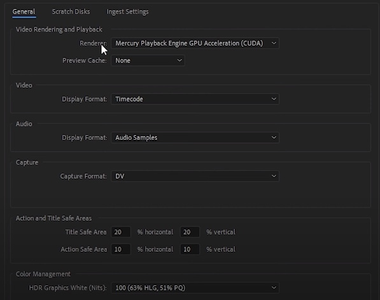
Step # 1: Enable GPU Acceleration (CUDA) In Premiere Pro
You need to enable GPU Acceleration (CUDA) In Premiere Pro. For that go to, File -> Project Settings -> General and apply the following Settings:
Step # 2: Enable H264 Hardware Encoding & Decoding In Premiere Pro
Go to Edit -> Preferences -> Media and apply H264 Encoding and Decoding.
Step # 3: Enable Hardware Encoding In Export Settings In Premiere ProGo to File -> Export and Apply Hardware Encoding for Performance Under Encoding Settings in Export Settings
Step # 4: Allocate Max RAM for Fast Rendering In Premiere ProGo to Edit -> Preferences -> Memory and allocate 3GB for others and maximum for Premiere Pro.
Step # 5: Delete Media Cache Files In Premiere ProGo to Edit -> Preferences -> Media Cache and delete any media cache file.
Step # 6: Reduce Preview Resolution In Premiere ProJust click the preview under video and change it to 1/2 or 1/4 to increase performance in Premiere Pro.
Step # 7: Enable NVIDIA Studio Driver In GeForce ExperienceIn order to use GPU ACCELERATION, we need to enable the Studio Driver. Go to GeForce Experience and select the Driver tab and select Studio Driver.Download GeForce Experience From here: Visit This Link
Step # 8: Download CUDA ToolKit To Enable GPU AccelerationIn order to use GPU ACCELERATION, we need to enable the CUDA ToolKit.Download CUDA ToolKit From here: Visit This Link
Step # 9: Apply Nvidia Control Panel Settings For Premiere ProYou must apply Nvidia Control Panel settings For Premiere Pro.
Step # 10: Use ProxiesProxy is a perfect method to increase rendering speed and overall experience in Premiere Pro.
Step # 11: Fix Export Stuck In Premiere ProIf you are stuck with export in Premiere Pro then I highly recommend watching this video
 Launch your Graphy